Tuesday, February 7, 2012

VDAY 2012


Last night, I went to see fellow Knotty Krafter Christy in "A Memory, A Monologue, A Rant, and A Prayer" as part of the V Day Movement. She was taking a stand against the violence facing women.  According the the UN, 1 in 3 women on the planet will be beaten or raped in her lifetime.


Christy absolutely KILLED it in the monologue "Fur Is Back" by Eve Ensler.  She was the perfect combination of poignant and funny. Christy is my hero. [SSHHHH: don't tell anyone, but she totally stole the show.]


To take a stand with Christy to end violence against women, join VDAY's ONE BILLION RISING campaign.  Join ONE BILLION RISING, FEBRUARY 14, 2013-- a global day of action for women and men across the planet to gather and dance to end violence against women and girls.  You can sign up at vday.org/billion or text BILLION to 50555.


To find a VDAY event in your area click here.

Cheers, Jaime

Monday, February 6, 2012

We have a Mann Crush!


Last night several Knotty Krafters went over to to our friend Becky's house to watch her brother CHRIS MANN on THE VOICE.  He was absolutely amazing and will now be moving on to the next round on Team Xtina!  We officially heart opera.

Becky with her Chris Mann Poster

You can check out Chris here:
http://www.nbc.com/the-voice/video/chris-manns-because-we-believe/138312/

Cheers,  Jaime

Quilt initiation! YEIKS!

Hello all!!!!!!!!!

I thought I would have my first post be about the first quilt I made!  Talk about a learning experince!

My wonderful mother gave me a kick in the rear to make a quilt after telling me there were only so many times she could fix the quilt my Grandmother had made me. So, I decided that I would have her teach me how to make my own quilt that I could use on a regular basis and retire my special Wedding Ring pattern quilt to keepsake status.

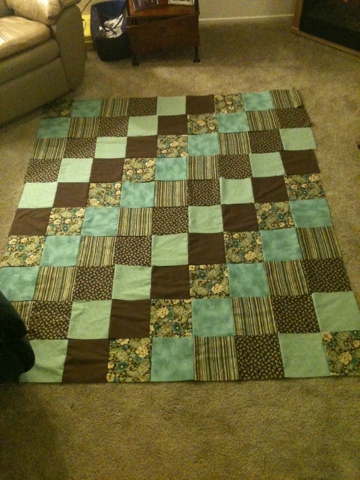
The “adventure” started with a trip to the local craft store to buy fabric. This is my favorite part! I LOVE picking fabrics for my quilts!! Apparently this is a great skill I got from my Grandmother :-) I picked 6 fabrics with a aqua-green and chocolate-brown color scheme in an attempt to match the ridiculously expensive bed set that I had…but of course didn’t use. (That will be a topic for another post!) They were BEAUTIFUL! We checked out and headed home to start sewing….or so I thought! Here is where the lesson really started! I learned that all the fabric needed to be washed, dried, and ironed before anything else could happen. I was geared up and ready to rock out a quilt and I had to wait for laundry?!?!?! YES! my mother said! So….I waited for the laundry and then ironed my lovely fabric later that day. This is my second favorite part :-) I’m weird I know, but there is something relaxing about ironing quilt fabric!
20110620-022101.jpg

With all the material ready it was time to cut. This is my least favorite part because the more precise you are here the easier it is when you start sewing. (I recommend doing what I did if you are not a good cutter and find a friend who is! Love you Jaime! :-D ) I had the cutting mat and rotational cutter all set up and folded my fabric to cut the ends off first. This is important because the ends are there to keep the fabric from stretching before it is used and it will sew differently than the rest of the fabric if you don’t cut it off. Thankfully it is usually no more than half an inch on the end!  Once I had the ends off I set out to cut my 8 inch blocks.

With all the blocks cut out it was TIME TO DESIGN! This part can be difficult if you aren’t patient with yourself. Take some time to look at patterns and see different layouts so you have somewhat of an idea of what you want and then leave room for your special spins on them! I took my blocks and laid out 3-4 different designs before deciding on the ONE! (At this point I was a day and a half in and hadn’t sewed 1 stitch! Talk about learning patience for the correct process!)

Then my mother gave me an amazing gift!!! She took me down and bought me my first sewing machine!!!!!!!!!!!!!! I’m not sure what it was, but I had such a sence of power having my own sewing machine! Like there was nothing I couldn’t make or fix if I really had to! It was great! Then she bid me farewell and sent me out to start sewing! The block quilt was a great pattern for a first quilt because it’s easy and there aren’t a lot of little pieces. I sewed each block into their rows with 1/4inch seams and then sewed the rows together. It was so exciting having the top done!

20110620-022150.jpg

With the top done we then went and bought “the filling” :-) and material for the back. Then we laid everything out on top of each other and safety pinned it together so the “quilting” could begin! I started in the middle and quilted (by hand) to the edges. It did take a few weeks, but I found that I enjoyed hand-quilting! It was nice to have something to do with my hands while watching tv in the evenings and is also a great way to keep warm having it on your lap!

Then before I knew it I had my first quilt!!!!!!!!!!!! And I was able to share my excitement with my friends and then THEY were inspired to learn how to make a quilt! That’s where this adventure really started! :-) Through this experience I learned things about my Grandmother I never knew and was able to feel a connection to her. I have memories of learning from my mother that I will keep in my heart always. Most importantly I gained knowledge and the amazing feeling of starting a project and then finishing it! It gave me confidence to start trying other things!  Like knitting! And Crocheting! 

20110620-022300.jpg

--Elaine

Thursday, February 2, 2012

Coming Soon....

Invading The Knotty Krafters, Star Wars is.  To our Etsy Store soon Yoda and R2D2 are coming.  Yeesssssssss.

Jennifer and Chloe show you a Sneak Peek of  an  R2D2 in the Making.

Wednesday, February 1, 2012

We need a craft board on aisle 3...

My good friend Grace gave me this fantastic orange grocery store aisle directory in law school. At that time, I took my daily direction from Stephen Colbert and turned it into a "dead to me" and "on notice" switchable board. That's right, I would list what subjects, individuals or general ideas were on the daily chopping block and display it for the rest of my apartment to peruse. Shockingly, it got little attention. A note to secured transactions: YOU ARE STILL DEAD TO ME.I'm sure you're all good friends to my addiction, also known as "pinterest." After several weeks of feeling less-than-par creatively with the rest of the world, I figured I could show those so-and-so's a think or two about my craft organization. I'll have to post later on my continual organization and REorganization of my craft room, but for now, you'll JUST HAVE TO LIVE with my craft board creation.

I'm sure the paint on this 1970's trashed aisle board was NOT lead based or any other toxic substance, so of COURSE I proceeded to redo my board with little to no attention to my health. You'll notice that I removed the little shelves attached with staples with my kitchen flatware. DO NOT TELL MY HUSBAND. He is very protective of our knives and forks.

So first thing first--get the old label shelves off the damn board. Done and done. Because the label shelves were a bit discolored, I filled my sink with some water and bleach and soaked those sons of guns. Next, I lightly sanded the whole board down to make sure that the old paint would not keep the new paint from sticking. As for the painting--I'll be honest--I used some old latex interior paint I had sitting in the garage and gave it a heavy two coats--take that, LEAD!
Next, I used some index cards, which it turns out are the PERFECT height for my craft board shelves. I marked with a pencil where to put them, and used some rubber cement to tack 'em down. On a side note, you will soon realize how addicted to rubber cement I am. It is my go-to gluer. I would like to think that I have diversified tastes, but rest assured, that never applies to my adhesives.


You'll note that the center aisle number display was a bit raised off of the sign. I painted it and rubber cemented a piece of black construction paper over it to hide any residue of the sleek former aisle number. May it rest in peace.

Finally, I chopped up one of the extra backside label shelves and added a center "craft board display topic" space. Brilliant, I know.


I've hung the "craft board organizer" in my craft room and I'll post a picture of it once I get home. I think this will help me organize my present and future endeavors, or, if all else fails, help me keep track of what ideas, people or legal conundrums are close to being pushed off a proverbial "dead to me" cliff. Whatever works.

Exit, pursued by a bear...
Christy


Chris Mann on The Voice

Our very good friend Becky's brother is going to be on The Voice this Sunday night!  Everybody should watch!!!!!  He's cute, right??


CHRIS MANN will entertain you as he auditions for NBC's "THE VOICE" Sunday Feb. 5 right after the Super Bowl. Watch and see how he does!!! chrismannmusic.com

the Good, the Bad, and the Scrubbie

When I moved to Wichita 3 years ago, Elaine's mom, Georgia, sent me the BEST HOUSEWARMING GIFT EVER!!!!!  Dear readers, I would like to introduce you to The Scrubbie.

The Scrubbie
What is this Scrubbie I speak of?  It is a little piece of crocheted nylon delight that you can use to clean most things in your house.  They are especially helpful for cleaning non-stick cookware without scratching the surface.  I am not exactly known for my cleaning prowess (come on people, you have seen my car).  My Scrubbie lets me get to tough cleaning jobs when I want to, but isn't as abrasive as an SOS or similar pad.  Best part about it is that I can put it in the dishwasher and it will clean and sterilize my Scrubbie when I am done.

Georgia 


So, after using the Scrubbies that Georgia gave me (Thanks, Georgia!) for 2 years, I finally decided that I needed to make some myself!  So, I asked Georgia very nicely to share her pattern with me.  Not only did she share it with me, but she also taught me to crochet!


Georgia's Scrubbies

Materials:
Nylon Netting-- I bought this at the fabric store by the yard.  For my first project I bought 3 yards, which should net 10 (ish) Scrubbies.  
Crochet Hook Size J

Abbreviations
Ch: Chain
DC:  Double Crochet
HDC:  Half Double Crochet
St:  Stitch
Sl st: Slip Stitch


Instructions:
Before you begin to crochet, cut your netting into strips that are at least 1.5 inches wide.  I folded my netting like very long accordion and then cut my strips width wise at the top.  Use these strips of netting as the yarn in the following pattern:


Row 1:  Ch 5, join with sl st to form ring.
Row 2:  Ch 2, 9 hdc in circle, join with sl st  to top of ch 2.  10 hdc
Row 3:  Ch 3, 2 dc in next st and each st around, dc in joinging st, join with sl st to top of ch 3.  20 dc.
Row 4:  Ch 3, 2 dc in next st and each st around, dc in joinging st, join with sl st to top of ch 3.  40 dc.  Fasten Off.


So, thank you Georgia for all of your advice and teaching me the secrets of The Scrubbie!  My family thanks you, too (as they all received them as Christmas presents this year).

Cheers, Jaime